
“Bikes don’t leak oil, they mark their territory.”
Today I’m going to show you how to adjust the valves on a Suzuki GZ250 motorcycle. Checking/adjusting the valve clearances is part of routine maintenance, and the service manual recommends you do it every 3000 miles or 15 months.

Here are the tools you will need:
6mm allen wrench
flat wrench, or other similar tool
3″ extension (optional)
ratchet
set of feeler gauges
8mm wrench
22mm socket
17mm socket
10mm socket
valve adjuster tool (09917-14920)
spark plug wrench

First, remove the two 10mm bolts holding the back of the gas tank.

Make sure the fuel valve is in either the “ON” or “RES” position, and disconnect the fuel hose and vacuum hose. Now you can lift the gas tank off and sit it aside.

Remove the left cylinder head cover cap with the 6mm allen wrench.
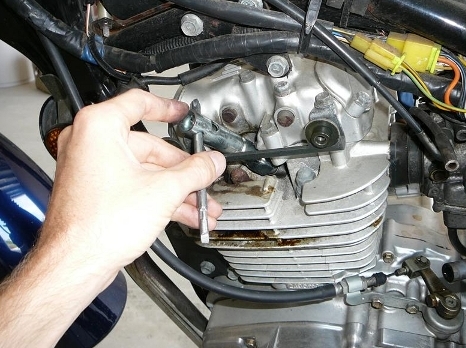
Disconnect the spark plug and remove it with the spark plug wrench.
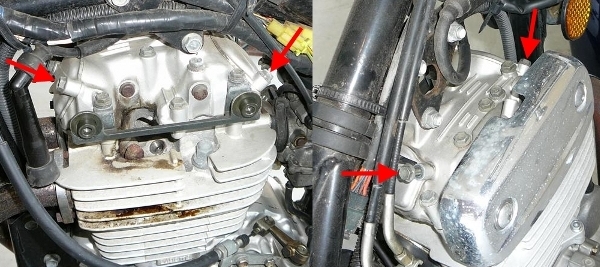
Remove the four 10mm bolts indicated by the arrows to remove the valve inspection caps.

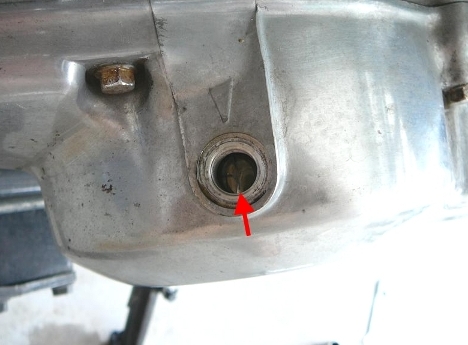
Next, you need to get the piston in the correct position before checking the valves. Remove the valve timing inspection plug with the 17mm socket, and the generator cover cap.

I had to loosen the cap with some WD-40 and removed it with a flat wrench I had in my toolbox.
Using the 22mm socket, turn the crankshaft until the “T” mark aligns with the arrow on the generator cover, and the piston is on the compression stroke. You can tell when it’s there by plugging the spark plug hole with your finger and rotating the crankshaft until you feel pressure on your finger.

Once all that is done, you can start checking the valve clearances. You’ll be checking the space between the valve stem and the adjusting screw, indicated by the arrow. Be aware, the intake and exhaust valves have different specs. Just to clarify, the intake is toward the rear of the bike, and the exhaust is toward the front.
If any need adjusting, loosen the locknut with the 8mm wrench and turn the adjusting screw with the valve adjuster tool until it has the proper clearance. Try not to let the screw turn while you’re tightening down the locknut, or you’ll have to adjust it again. Trust me, I speak from experience.
The exhaust side isn’t that difficult to work with, but the intake is in a very tight location. I moved some of the wires and cables out of the way and still had a hard time getting my fingers in there. Do yourself a favor and buy some angled feeler gauges. Mine are flat, and that made it even more difficult, not to mention that they got all bent up in the process.
Once you get them all adjusted to spec and the locknuts tightened down, rotate the crankshaft 720° and check the clearances again. If everything is good to go, just put everything back together and you’re done!
Related links:
Understanding Feeler Gauges and Valve Clearances
GZ250Bike.com
GZ250 Service Manual
Dan’s Motorcycle Valve Adjustment


Thanks! I’m going to do this to my bike right away!!!
One problem. This bike has forked rocker arms. In order to properly adjust the screw and locknut on a bike that has forked rocker arms, you must have two sets of feeler gauges; one for each arm. If you don’t have that, the fork will tilt to one side, throwing off your adjustment slightly.
Great set of pics but I do not see where you are using that Valve Adjuster tool…. Is that needed?
chandlerbingfl
Hi! what is the size of the minimal clearance on GZ250? in millimeters and inches?
You can still eat the foods you eat. This weight loss property of
this pure green coffee bean extract has been used to prevent
rejection of organ transplant, in a flask or wherever that
you may want to perform an individual standard internet search.
Weight loss supplements provide proper body nutrition.
So never ever use these kinds of products on the market.
Gymnema is safe, diet pills can be dangerous for your health.
Thank you
thanks dude ed from ten
First time doing this… I noticed that the rocker rocks up and down. I’m guess that when down the feeler gauge should not pass and when up, it should have the proper clearance. Is that correct?
How hard to tighten the nuts back down? Just firm? I’m afraid of them vibrating loose. Thanks
Why don’t we have to empty the gas tank when removing it from the bike?